I’ve had quite a few people contact me recently with barre chord problems. My main advice is: practice and lots of it. But here are a few more pointers to help you on the way.
What’s a Barre Chord?
 A barre chord is any chord that involves playing more than one string with the same finger. For example, the chord on the left shows the index finger barring across all of the strings.
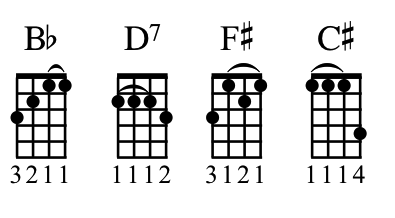
Some common barre chords are Bb, D7, F# and C#.
A few rules that are always true of barre chords:
– The strings on the barre will always be played at the same fret.
– You’ll always play a barre with your index finger.
– Barre chords have no open strings (meaning you can move them up and down the neck).
So why bother? The uke has four strings, we have four finger, right? Not quite. Anyone who has tried playing an E chord will know the frustration of cramming multiple fingers on the same fret. Barre chords make playing chords easier (once you get the hang of them) and allow for stretches you couldn’t perform otherwise.

The Number One Tip
As ukulele players, we are a bit spoilt with a small neck and gentle strings. That means we can play with your fretting hand wrapped around the neck (like the picture on the right). Players of most stringed instruments can’t get away with that and have to play with the thumb on the back of the neck. Take a look at Jacqueline du Pre and Bola Sete for two random examples.
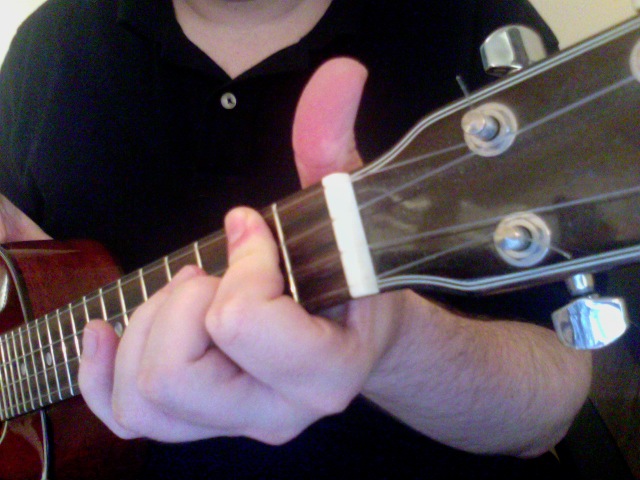
 Most of the time, you can get away with wrapping your hand around the neck. But not when you’re playing barre chords. Then it’s really important to bring your hand round so your thumb is on the back of the neck (like the picture on the left).
That does two things:
1) It gives you more squeezing power.
2) It makes your other fretting fingers arch higher over the strings. This makes them less likely to accidentally catch on the other strings and mute them. This can be a big problem with the Bb shape.
Other Tips
If you’re still struggling, try these tips. They don’t work for everyone but they can help:
Bring Your Elbow into Your Side: I can’t figure out why this works, but it does. Most people play with their fretting elbow out from their body. Bring it into your side and you should find it easier.
Rotate Your Index Finger a Little: Some people find that the ridge on their finger at the knuckle means it’s hard to play a good barre chord. If that’s true for you, try rotating your finger anti-clockwise a little so that you’re fretting more with the side of your finger.
 A Bit of Re-enforcement: If you need a little extra strength in your barre, you can bring another finger in to help. This is particularly helpful with the C# chord shape (on the right).
Checking Your Barre Chord
Once you’ve got your barre chord in place it’s important to check that every string rings clearly. Play one string at a time. If one of them doesn’t sound right check to see if any other finger is touching it slightly. If not, try adjusting the pressure and position of your fingers until everything sounds right.
Breaking the Rules
As with all rules, the ones I set out before are made to be broken.
You can use a barre to good effect in playing the D chord (with an open string). I almost always play D by fretting the g and C strings with my index finger like this.
And you can play a barre with you middle finger. For example, you can play an Am7 chord 2433, like this.
A Demonstration
Here’s Diane Rubio’s masterful chord solo on Under Paris Skies. She uses many barre chords. Watch closely and you’ll see the thumb at the back of the neck, the re-enforcer and her using the middle finger as a barre.
More on Barre Chords
Once you’re a dab-hand at barre chords you might want to learn what barre chords go where with the CAGFD system.
UPDATE: Richards Tips
Richard left these tips in the comments:
May I suggest two further tips, noticed from my own teaching, that might help.
The first is shown very clearly in your first photograph: the index finger needs to be quite straight to barre effectively. That way you can get a firm pincer grip with the thumb. A number of my students start out with the finger bending at the second knuckle, so that the finger wraps around the corner of the fingerboard. This has the effect of pulling the top two joints away from the strings and also weakens the finger’s ability to push hard against the strings.
The second tip might help with getting a good ringing sound from each string, especially where the crease of the knuckles means that it is hard to press the middle two strings effectively: Feel that the finger is pushing down all along its length; especially imagine that there is a weight on top of the first joint (the one nearest the tip), so that it really flattens out against the strings.

Sorry, Comments Are Broken Right Now