Category: Tutorials

  • Muted Strums Tutorial

    Muted strums are a useful tool to have in your repertoire. They can add percussion and syncopation to an otherwise boring strum.

    You perform them by resting a finger or fingers from your fretting hand on the strings. You need to hold them down enough so the strings don’t ring open but not strong enough to hold them down. If you just rest them against the string without applying any pressure it should do the trick.

    There are a few different ways you can perform them:

    – One/Two finger mute: Relax the chord you’re holding, lay pinkie or ringer finger or both across the strings. The advantage of this is that you keep your fretting fingers in the chord position. So it’s useful for mid-strum mutes.

    – All-finger mute: Rest all your fingers across the strings. This produces a very solid mute but does mean your fingers are out of position for chords.

    – Chord release mute: If a chord has you fretting all the strings you can create a mute just by releasing pressure with your fingers just enough to stop the chord sounding. The advantage with this technique is you can very quickly switch between muted and open strums.

    A Chnk Alternative

    The most obvious way to use muted strums is as a substitute for chnks. They provide a similar percussive sound but are easier to pull off.

    Here’s a typical chnk strum played with one finger muted strums. Slowly then up to speed.

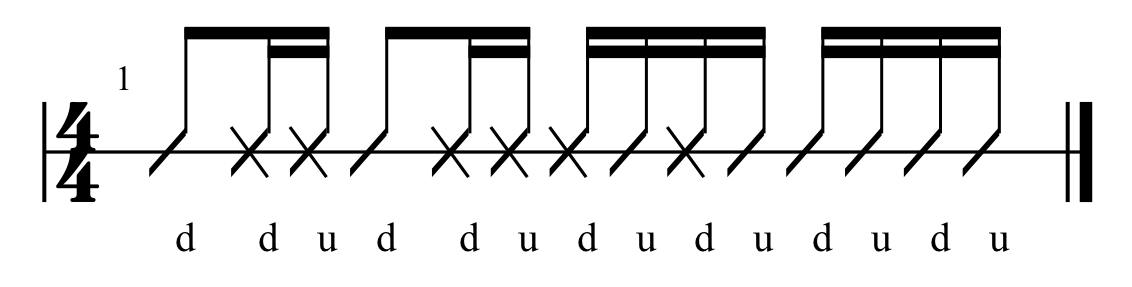
    d u x u d u x u

    The main advantage they have over chnks is that they can be played on up-strums as well as down-strums.

    d u x x d u x x

    Nirvana Style Mutes

    Another common place to use them is between chord changes. Most famously used in Smells Like Teen Spirit.

    In this example I’m using all-finger muting.

    d – d – x x x x

    Niles Rogers Style Mutes

    The speed you can apply the chord release muting makes it perfect for funk and disco chord vamps. The great part is that you can just strum down-up-down-up and switch between muted and unmuted strums to create the rhythm.

    In this example I’m playing and muting a G9 chord 4555.
    Picking Hand Muting

    You can also mute the strings at the strumming end of the uke by resting the side of your hand on the strings just in front of the bridge. That dampens the string while still letting you fret the strings and produce a note. You can do this while strumming but it’s even more effective on single notes.

    Here’s a little riff on the C-string just switching between the third and fifth fret. I play this with fingerpicking but this technique works well if you’re using a pick and is easier that way.

    Further Reading

    How to Play Ukulele Strums: my ebook on all things strum related.
    Easy alternatives to chnking
    Strum blocking
  • What it Takes to be a Good Ukulele Group Leader

    A guest post today from Joshua Waldman. As well as leading the Tigard Ukulele Group he has just released a book How to Start and Grow a Ukulele Group (available in digital and paper form (affiliate links)). It’s by far the most comprehensive and inspiring I know of. Highly recommended if you’re starting or running a ukulele group.

    When I started the Tigard Ukulele Group (TUG), I had no interest in leadership. I work for myself in a home office. My business is online and I don’t have a team to manage, nor do I have a boss to worry about. I’m not trying to be a better boss or climb some corporate ladder. What does leadership have to do with me?

    Turns out, I found an answer to that question very quickly! Running an ukulele group has been one of the greatest personal growth journeys I’ve ever undertaken.

    What I learned is that being a leader requires you to find your self-confidence, own the room, make decisions and take risks. It also means potentially making public mistakes and embarrassing yourself. But it also means being someone that others can rely on, being the beacon that guides people, of taking the initiative on fun and inspiring projects.

    You make the call

    When I first started TUG, we went around in a song circle. Everyone brought their own songs and some extra copies to pass around. This worked fine for the first few weeks and when we had around seven people in my living room. However, as we grew, the song circle format fell apart. Songs bombed. We ran out of music to play.
    So the next time we met, I told them what we were playing. “Here’s our song list.” I remember feeling totally surprised that everyone agreed to this. Looking back, this makes sense, they came to play music, not lead a group. That was my job. Even now, at potlucks and parties, when I ask the group what they want to play they look back at me and say, you tell us, we’ll follow.

    A few years ago, we were preparing for our very first concert and used our jam sessions to practice songs on our setlist. Our focus was to get into songs and out of songs at the same time. For weeks, we played the same songs over and over again. The concert happened. It went great! And I kept up the practice of repeating songs that needed more work.

    After a while of this new format, I checked in with the group to see if they were getting tired of this. To my surprise, everyone really appreciated it. This format continued naturally, even after the concert. In fact, to this day, if a song could have gone better, and I’m about to flip to the next one, members will ask to repeat it, “just one more time.”

    You are the leader of your group. You make the calls. Stop looking for approval or consensus. It’s not you imposing your will on others. It’s you offering others the chance to relax and just follow along. Leadership is service to others.

    Own your mistakes

    We were working on a difficult and highly orchestrated song at TUG one time when a longtime member who hadn’t been for a while showed up. She hadn’t been there the previous two weeks while we were working on this. When she raised her hand and offered some suggestions that would have radically changed what we’d been doing for weeks, I shut her down. “It is the way it is. No more changes,” I said and then watched as she shut down, stopped playing and her body folded in on itself.

    I immediately realized my mistake, having gotten so intensely focused on getting the song right that I forgot that we were there to have fun! After the session, I went up to her and apologized. Although she shook it off, said it was no problem and changed the subject, I could tell she appreciated the apology.
    Leadership isn’t always easy. But it does make you a better human being as long as you learn from your mistakes.
    What I learned from leadership

    What I learned is that leadership is a very personal journey. It’s a mirror for your own limiting beliefs, low self-esteem, self-doubt and fears. One of the greatest benefits of having started this group has been the chance to face these parts of myself and deal with them and then grow as a person.

    Leadership is an interesting thing. In an age that seems to value collaboration and groupthink as ultimate ideals, apparent leadership seems to be based on how rich you are or how many likes you get on social media posts. I think this is a sad waste. Everyone has leadership potential. Despite our media, human nature is human nature, and groups of humans seek out a leader to represent them. The world isn’t run on consensus or on who has the most likes.

    Joshua Waldman is the founder of Tigard Ukulele Group and had just published a book called, How to Start an Ukulele Group where you can find more stories and thoughts on ukulele group leadership.

  • No Hassle Chord Changes

    With all the intricate and dexterous actions that evolution has equipped our hands for it’s left us woefully unprepared to play an Fmaj7 chord on the ukulele. It’s made plenty of chord changes a pain in the arse too.

    Laziness to the rescue! You can change the fingering of a chord or use a different inversion to make changes much more straightforward.

    Here are a few tricky chord changes that can be simplified with a bit of rejiggering.

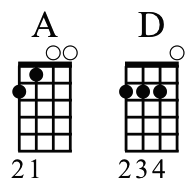
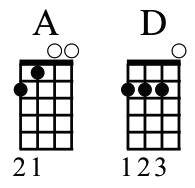
    A to D

    Here’s an obvious refingering. If you use your second, third and fourth fingers to play it you can keep your first finger tucked behind.

    The Sucker Way

    The Smart Way

    Video Comparison

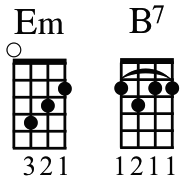
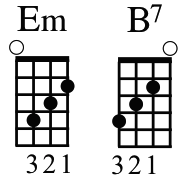
    Em to B7

    In chord charts the B7 is almost always shown played with a barre. But it doesn’t have to be. Switch the notes on the g and A strings and you get the Em chord shape with everything moved across one string.

    The Sucker Way

    The Smart Way

    Video Comparison

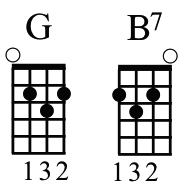
    G to B7

    Another B7. This one doesn’t actually have a B in it. But thanks to crazy ear-shenanigans your brain fills in the B for you (here’s Vi Hart explaining it as well as why chords and scales are as they are).

    The Sucker Way

    The Smart Way

    Video Comparison

    Anything to Fmaj7

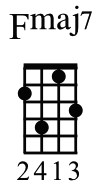
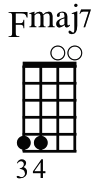
    If anyone tells you to play Fmaj7 the 2413 way throw your ukulele at them and run away. They are not your friend. In the first take of my trying to play the chord you can actually hear my wrist cracking as I attempt it.

    The Sucker Way

    The Smart Way

    Video Comparison

    D7 to G7

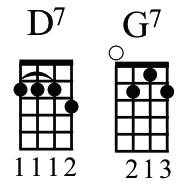
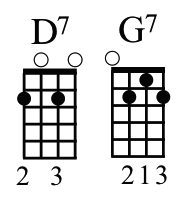
    Like the B7, this version of D7 doesn’t actually have a D. But it is way easier to play. This version is often called the ‘Hawaiian D7′ for reasons that elude me.

    The Sucker Way

    The Smart Way

    Video Comparison

  • Fingerpicking Patterns

    Following on with this week’s fingerpicking accompaniment theme with some popular ukulele picking patterns.

    I’ve put up a few mini-posts earlier today covering:

    – One Finger Per String Picking Method
    – Thumb and Two Fingers Picking Method
    – Fingerpicking Notation

    Thumb and Two Fingers Picking

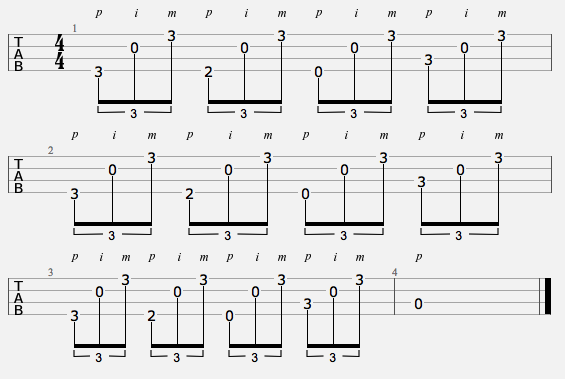
    PIMP Pattern

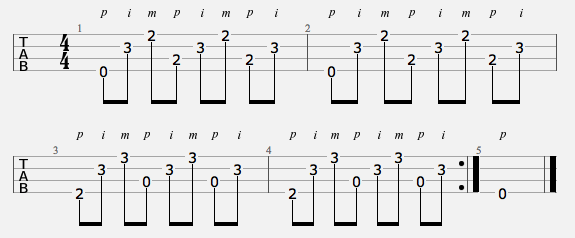
    A simple pattern using each finger in order with the thumb starting on the g-string then moving to the C-string. Making a p i m p i m p i m… picking pattern.

    Since you’re using three fingers, this pattern is well suited to playing in triplets.

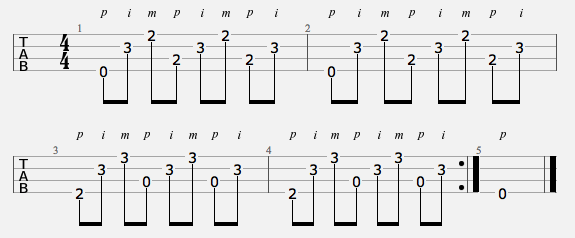
    Complicated PIMP Pattern

    A similar pattern to last time. But here you’re not using triplets so you have to fill out the bar with just the first two notes of the pattern. So you play p i m but just p i the final time.

    Reverse Pattern

    Rather than going up the strings as you did in the last two patterns here you pluck with the thumb then go down the strings. So it’s p m i repeated.

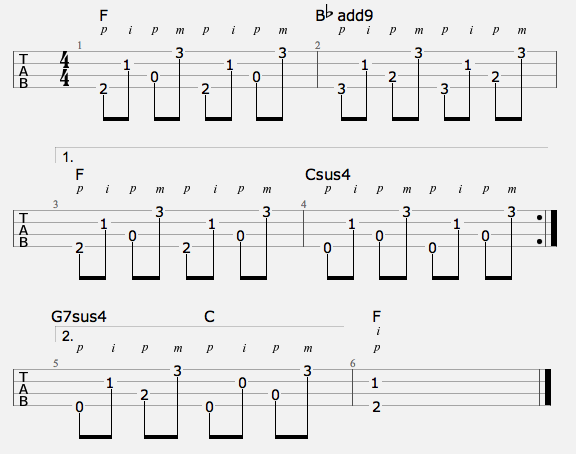
    Alternate Picking

    Alternating is my favourite way to use the thumb and two fingers method. Here the thumb alternates between the g- and C-strings.

    In this particular pattern you pluck g-string with your thumb, E with middle, C-string with thumb, A with middle. So it’s p i p m.

    One Finger Per String Picking

    PIMA Pattern

    Picking with your thumb and going up the strings to make p a m i.

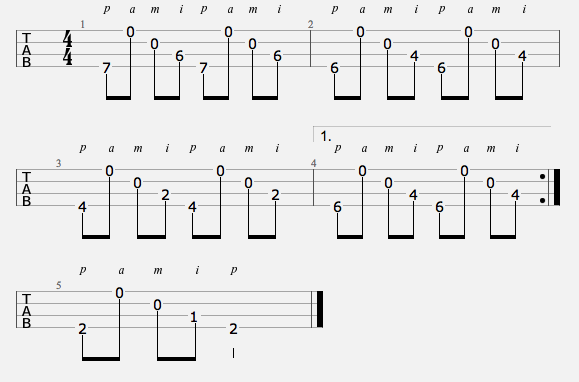
    PAMI Pattern

    Here you pluck the g-string with your thumb. Then go through the strings in the opposite direction. Making a p a m i pattern.

    Choosing a Pattern

    If you’re unsure of which method of picking to use for a pattern I have a general rule for choosing.

    If the g- and C-strings are played next to each other at any point I go with the one finger per string method. It’s much easier than having to switch strings with your thumb quickly.

    But if the g- and C-strings aren’t played consecutively then I’ll go with the thumb and two fingers method. I find it much easier to play in general.

    Here’s a quick illustration. This is the first thumb and two fingers method played using the one finger person string method. If you’re anything like me you’ll find it trickier to play this way.

  • Fingerpicking Notation


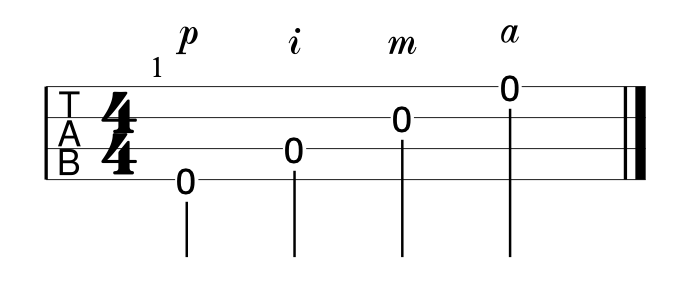
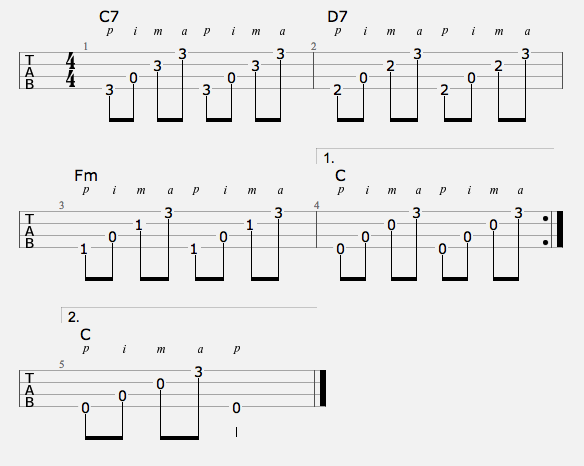
    In ukulele tab the finger you use to pluck the note is indicated by a letter in italics above the tab. They look like this:

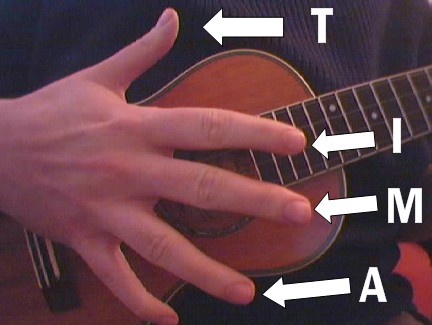
    Each letter corresponds to a finger on your picking hand:

    t or p = Thumb

    i = Index Finger

    m = Middle Finger

    a = Ring Finger

    So when a note has an i above it you pluck that string with your index finger.

    You won’t always find the picking notation. Sometimes you’ll just see it at the beginning of the piece and you just carry on that pattern all the way through. Sometimes you’ll just get the fingering for tricky sections.

    The names are shortened from: pulgar, indice, medius, annular.

  • Thumb and Two Fingers Picking

    The Thumb and Two Finger Method of fingerpicking differs from the One Finger Per String Method in two ways:

    – You don’t use your ring finger. All the picking is done with thumb, index finger and middle finger.
    – The thumb plays notes on both the g- and C-strings.

    So the fingers cover these strings:

    Thumb: g- and C-strings.
    Index Finger: E-string.
    Middle finger: A-string.

    This method of picking has a few advantages over

    The big disadvantage is that it makes it harder to play patterns where the g- and C-stings are played next to each other in a pattern. So if you’re playing a pattern that has that use the One Finger Per String Method.

    An Example

    Links

    Learn some fingerpicking patterns using this technique
    Fingerpicking Notation

  • One Finger Per String Picking


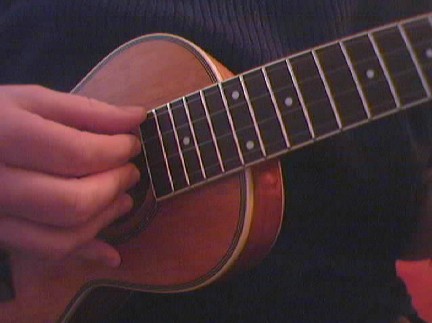
    The One Finger Per String Method is the most logical way of arranging your picking hand. Each string is allocated a finger. Each string is only played with one finger and each finger only plays one string.

    They are arranged:

    Thumb – g-string

    Index Finger – C string

    Middle Finger – E string

    Ring Finger – A string

    Like this:

    As you can see, I use my little finger as an anchor. Don’t copy that! It’s a bad habit. This stabilizes the hand but there is a trade off. Letting you hand hover over the strings will give your fingers greater flexibility and make it easier to switch between picking and strumming.

    And it means my hand always falls into that position. So whenever I’ve chugging a beer in a manly fashion I’m also raising a delicate pinkie.

    An Example

    Links

    Learn some fingerpicking patterns using this technique
    Thumb and Two Fingers Method
    Fingerpicking Notation