There’s more than one way to play any chord. You can find different versions of every chord up and down the neck (known as ‘chord inversions’). And it’s well worth using them. Playing different inversions makes any song more interesting. Particularly if you’re playing with other ukuleles. Having different people play different inversions will open up the sound.
The other day I posted this video of Bosko talking about the CAGFD system with Jim D’Ville – which is the way he thinks about chord inversions. It’s a tricky concept to get across in a short video so it did cause a bit of confusion. He has a full explanation here, but I think it’s a really useful way of thinking about inversions so here’s my shot at explaining it.
For the sake of this post, I’ve simplified the CAGFD system down to FAC. Partly because those are the most useful chord shapes but mostly because it sounds a bit like a rude word. I’ve focused on the major chords here. If you think this post is useful and you want me to tackle the minor and 7 chords in the same way, leave a comment. I had a hard time working out how to explain things clearly in this post so if there’s anything you don’t get, ask in the comments and I’ll try my best to straighten it out.
Making Moveable Chord Shapes
Any of the simple chord shapes you know can be changed into a moveable chord shape (any chord where there are no open strings). All you have to do is replace the nut with your index finger.
Once you have a moveable shape you can move it up and down the fretboard and it will always retain its flavour (major, minor, 7, whatever).
F Shape
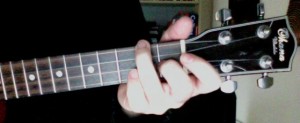
Take the F chord. First off you need to free up your index/pointer finger. To do that use your ringer finger to fret the g-string at the second fret and your middle finger to fret the E-string, 1st fret. So you have this:
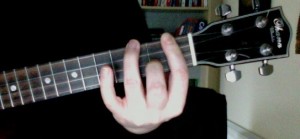
Move both those fingers up a fret (so your ring finger is at the third fret and middle finger is at the second). Then barre across the first fret with your index finger so you get this:
If you imagine the index finger as the nut, you can see you’re using the same shape as the F chord.
You can move this shape up the neck and it will always be a major chord.
A Shape
You can do the same thing with the A chord shape. Start by freeing up your index finger by using your middle (C string, first fret) and ring finger.
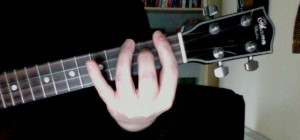
Then move everything up one fret and barre across the first fret with your index finger so you end up with this:
So it’s like an A chord shape with your index finger taking the place of the nut.
This time your barre finger is only holding down the A and E strings so you can do a half bar like this if it’s more comfortable for you:
C Shape
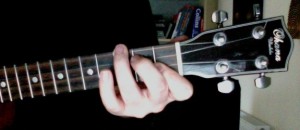
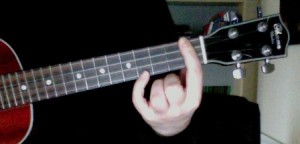
The same thing goes for the C chord shape. Fret the A-string, third fret with your pinkie. Move it up a fret. Barre across with your index finger and you get this:
Note: You don’t have to hold your middle and ring fingers like a total wazzock as I do in the picture.
Major Chords – FAC
Once you’ve got the chord shapes, next you need to know where on the neck to play them.
Each of the shapes has the root note (the one the chord is named after e.g. the root of the F chord is F, the root of Cm7 is C) in a particular place. It’s in the same place no matter where you use the shape.
All you have to do is match that note in the chord chord with the position of the note you want on the fretboard.
F Shape
The root note in the F shape is on the E-string.
A Shape
The root note of the A shape is on the g and A-strings. (Both the notes are exactly the same – play them together and you won’t able to tell the difference).
C Shape
In the C shape the root notes are on the C and A strings.
Fretboard Knowledge
Learning all the notes on the fretboard is a daunting task. 12 frets and 4 stings gives you 48 notes to memorize.
But you can use the FAC shapes just by knowing the notes on the A and E strings. And to start with just learn the notes that crop up most often in ukulele playing. That cuts your learning down to a more manageable 10 notes.
A-String
E-String
If you need a chord that isn’t one of those most common notes it’s pretty easy to work out from what you do know. E.g. E is one fret below F, Bb is one fret above A etc.
Putting It Together
Here’s an example using the C chord.
Start out with the C chord that we all know.
The C shape has the root note on the A-string. And, checking against the diagram, the A-string, 3rd fret is a C note.
Moving on to the A shape. The A shape also has the root note on the A-string. So you make the A shape making sure you’re playing the A string at the third fret.
The F shape has the root note on the E-string. And the C is at the 8th fret on the E-string. So make the F shape so that your middle finger is fretting the E-string at the eighth fret.
Note that your index-finger barre is at the 7th fret here.
All those C chords are completely interchangeable. Wherever you see a C on a chord chart you can use any of those that take your fancy.
And that’s what you do to find inversions of any chord:
– Pick one of the chord shapes.
– Find the location of the root note of the chord.
– Match it to the note on the fretboard.
If you found this lesson useful, please do consider getting a copy of Bosko and Honey’s Ukulele Safari CD – currently all the money from the CDs is going towards the Japan & Pacific Disaster 2011 Appeal. Alternatively you can donate directly to the Red Cross:








This clicked something in my mind. I am at work so I cannot play with it right away – but I think a lot of things just made sense to me.
<— mind blown.
Thanks!