I’ve been using Guitar Pro for almost 10 years. I think all my tabs on Uke Hunt have been made with it. I highly recommend it if you’re getting into making uke tabs.
Out of the box, it is set up for guitar so I thought I’d pass on what I’ve learnt about using Guitar Pro 6 for making ukulele tabs along with a few general tips (note: this is not at all a substitute for reading the actual manual).
Starting a Ukulele Tab
Start by going to File > New Score > Empty. (You can just cancel out of the Score Information screen for now.)
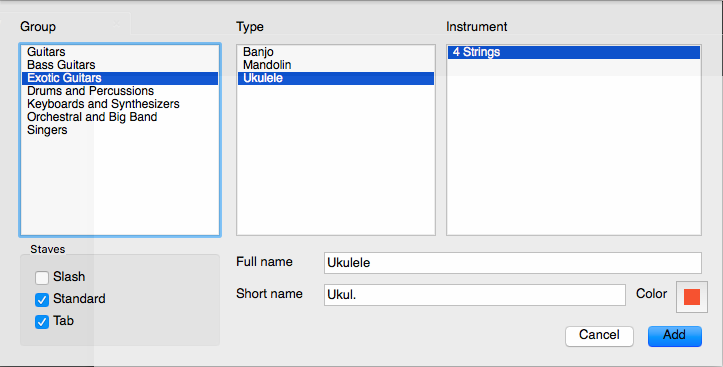
Now set up a ukulele tab by going to Track > Add… and it’ll bring up this window:
You can find the ukulele under the slightly kinky sounding “Exotic Guitars”. In the bottom left corner there are options to show slash notation (more on that later), standard notation (which I leave off most of my tabs) and tab.
Changing the Tuning
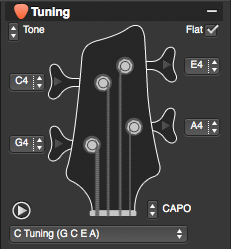
By default, the tab created is in high-g gCEA tuning. You can change that by clicking on the guitar in the far left column which brings up this picture of a bass guitar head:
If you click the drop down menu where it says “C Tuning” you get options to change to D-tuning or low-G tuning. Select which you want then click either of the Apply ticks (it makes no difference which if you haven’t started your tab yet).
There aren’t options for low-A or baritone tuning but they’re easy to create. Make low-A by selecting D-tuning. Then go to the bottom left tuner of the bass guitar and click the down arrow until the box reads A3. You can save the tuning for future use by clicking the arrow that has just appeared next to the drop down box:
Setting up baritone tuning is the same process with a lot more clicking. Start with low-G tuning then click the down arrow on each of the little tuner boxes five times to give you D3, G3, B3 and E4. Then you click the down arrow, give the tuning a name and you’ll be to use it at any point in the future.
Making Ukulele Chords
There are a couple of ways to add chord charts to the tab. By default it’ll put the chord name above the stave and show all the chords used underneath the song title, artist etc.
The first way is to find the location of the chord change on the tab then click this little Am guitar chord:
That brings up a box that lets you select or create your chord. It’s pre-populated with the notes in the tab at the position you’ve selected.
The other method uses the sidebar that pops up when you click the big C7 in the far left. You’ll see a box with a dotted outline and a plus sign. Click that and it’ll bring up the same chord maker used in the first method. Make your chords there and you can add them to the tab at any point you select.
Whichever way you create the chords they’ll end up in that sidebar. It’s a much easier way of adding the same chord at many places in the tab.
I’d recommend adding some common ukulele chords there in the sidebar. They are saved as part of the template that we’re setting up so they’ll be there for any new tab you create. Mine has all the major, minor and 7 chords (arranged in circle of fifths order so chords that are played together are close together).
By default Guitar Pro uses slash chords for the chord names. This is less than ideal for ukulele chords so I recommend going to preferences (Guitar Pro > Preferences on Mac or File > Preferences on Windows) and unchecking “Add the bass note to the chord’s name…”.
If you want your chord diagrams above the tab itself rather than all at the beginning you can change that by going to Files > Stylesheet then tick “Diagrams in the score”.
Changing the Sizes and Other Styles
I find the default sizing of ukulele tabs to be a little small. You can bump it up by going to File > Stylesheet. The option for “Global score proportions” is 6 by default. I like to set it to 8.
There are a whole heap of options in the Stylesheet. I recommend having a look through to see what’s there. There might be a few things you want to change straight away. And there’ll be others you’ll find you want to change as you make tabs.
Saving a Ukulele Template
Now you’ve done all the hard work setting the tab up you can save it to use any time you want it.
Just go to File > Save template as… then give it a name and save it in the templates folder.
Now when you go to File > New Score you’ll see your new setup there.
If this is going to be the setup you use most often then you can make it the default. Go to the preferences screen and change the “Default template” to the one you’ve just made.
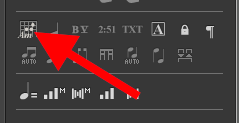
Once you’ve done that you can start a new ukulele tab with your preferred settings by clicking this little button at the top left:
My Template
If you don’t want to go through that palaver here’s the template I use:
Guitar Pro Ukulele Template
To add it, unzip the file. Then open Guitar Pro and select File > Open and find it on your computer. Make any changes you like, save it as a template and set it as the default.
Changing Bar Layout
Guitar Pro does try to automatically layout the bars in your tab in a sensible way. But I always do some tweaking to get it right.
You can bring up the bar arranger by clicking on this tiny button with the blue triangle at the bottom of the window:
That gives you the options to increase or decrease the number of bars on a line and lets you adjust the width of each bar.
Better still, you can change how many bars on every line of the tab. Go to Bar > System Layout… and select the “Fixed bar count per system” radio button. I like to go with either two or three bars per line depending on the piece. If you select “Same size for all bars” then they’ll be nicely lined up through the whole tab.
Transposing to Ukulele
A big advantage of Guitar Pro is the amount of tabs for it that can be found on the web. Ultimate Guitar is a great source (you even find my pre Uke Hunt guitar tabs on there).
It’s easy to transfer tabs from guitar (or bass or whatever) to ukulele. You just copy it from the original tab and paste it into a ukulele tab.
The big problem you’ll come across is that most guitar parts will have notes that are too low to played on the ukulele. These are just turned into rests by Guitar Pro. You need to transpose the tab up into the ukulele’s range.
You can transpose any piece of tab by selecting the part you want to transpose then going to Tools > Transpose. That brings up a box with a few options. Choose how many semitones up you want to transpose it (one semitone = one fret) then OK it. You can also transpose the whole track (by selecting “All bars”) or all the instruments in the tab (“All tracks”).
There are a couple of ways you can approach transposing to ukulele. If you don’t care about what key it is in, find the lowest note in the tab and work out how much you have to transpose it upwards until it reaches the C of a ukulele (or whatever the lowest note you’ve got in the tuning you’re using).
If you want to keep it in the same key you need to transpose the track up by an octave (+12). It’s possible you’ll still have notes that are too low. In that case, transpose up another octave.
Thanks to it’s reentrant tuning, the ukulele is a tricky instrument to transpose to. There are so many ways to play the same series of notes on a ukulele. Because of that when you transpose into ukulele tuning you’re going to have to do some rearranging of notes to get it playable in a sensible way.
Slash Notation Weirdness
Guitar Pro’s slash notation (used to show strums) doesn’t play well with ukulele tab. The chord names overlap with the stems of the notes. Like this:
But slash notation looks exactly the same for guitar as it does ukulele. So make your slash notation on a guitar tab (the notes don’t matter at all) and that fixes the problem.
Preferences
It’s been a long time so I’m not sure of the defaults for Guitar Pro. But I’d highly recommend making sure of these settings:
– Back up every [] actions: I have it set to every five actions. It’s saved my arse a few times.
– Add the bass notes to the chord name…: Turn it off for ukulele chords. They’re useful for guitar slash chords but on the ukulele they’re just unnecessarily confusing.
– Play sound when editing: I find it helps me to pick up on any mistakes I make.
Tips for Exporting
I find the best way to export tabs is to go with PDFs. They’re very shareable, downloadable, don’t require any special software and can be viewed on pretty much any device. And Guitar Pro handles them very well.
It doesn’t handle images so well though. It does export lower quality png files with a grey background. That’s pretty much ideal for use on my blog (it makes them quick to download and the grey matches the background of the site). But it’s definitely not ideal for all occasions.
If you want high-quality, white-background images the best way I know of is to export a PDF. Then export the PDF as an image (I do this in Preview on the Mac: Go to File > Export… and in the Format dropdown box choose your preferred image type).
You can also export your tab as a Guitar Pro file. This is great if you’re collaborating with someone or are looking to give other people the chance to build on your tab.
Unfortunately, the file format used by GP6, .gpx, is tightly locked down. I haven’t seen any other tab software that’s able to import it. However, many can open .gp5 files. So this is the best way to share Guitar Pro files.
You can create them by going to File > Export > GP5…


This is very generous, sharing a decade if expertise. I’m not into tabbing music myself, but again: sharing a decade of expertise is very, very generous. Kudos to the bearded guy.