Hot on the heels of Cincinnati Flow Rag, here’s another Reverend Gary Davis tune from David Beckingham. David retains Rev’s alternated picking with lots of thumb and two finger picking in his arrangement.
When I’m analysing a chord progression I like to think of it in terms of a story. With each chord being a new mood and scene and pushing the story forward.
For example, play a simple chord progression like C – F – G7 – C.
The C chord is the family at home all safe and settled. The F chord moves somewhere unfamiliar with the kids wandering off into the woods and finding a gingerbread house.
Then the G7 chord is pivotal. It’s the part that has you on the edge of your seat waiting for what comes next. If you stop a progression on the G7 it’s ending the story, “Then the witch grabbed the annoying kid and marched him towards the oven. The End.” There’s a tension that you need to resolve.
That propels the progression back to C. Taking you back home where you can feel safe and settled.
A good chord is one that tells its part of the story. You can read a whole lot more about this in the book I wrote about chords. But here are my favourites. Let me know yours in the comments.
Dm
The saddest of all the chords. I don’t know why but it makes people weep instantly.
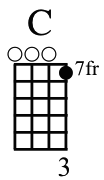
C is the most common chord so it’s good to spice it up sometimes. For this inversion of the chord (which I’ll refer to as C/e) you just move your finger up from the 3rd fret to the 7th fret.
The high E gives it a bit of sweetness at the top end. And makes it sound less final than the usual C chord. So it’s a good place to start a chord progression which heads towards the final C.
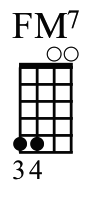
Fmaj7 gets overlooked a lot. Probably because it’s usually rendered in chord books as 2413 (presumably by either people who’ve never played the chord or shadow puppet masters). The vastly easier way of playing it is 5500.
I find Fmaj7 a very hard chord to pin down. It’s relaxed but it has a melancholy edge to it. It has the sweetness of a standard F chord. But it also has the tension between E and F notes. Hold down the chord and play the C and E strings together and you’ll hear how dissonant it is.
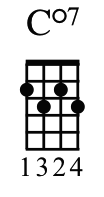
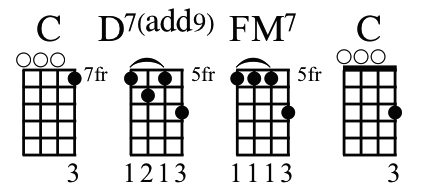
My favourite property of diminished chords is that all the chord inversions up the neck have the same shape. For example the Cdim7 (or Co7) has these inversions:
So all these chords have the same notes. Just in a different order. The notes on the first chord (going from the g-string to the A-string) are: A – Eb – F# – C. On the second chord it’s: C – F# – A – Eb. On the third: Eb – A – C – F#. And finally: F# – C – Eb – A.
Same notes, different order. Try this with any other chord shape and you’ll get completely different notes.
I regard it as the ‘girl tied to the train tracks’ chord. It’s a nervous chord. Full of peril.
In a Progression
Here I’m just playing the inversions of Cdim7 going up the neck in sequence.
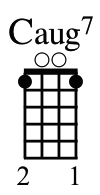
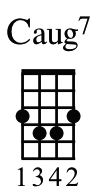
This is what I went with for my favourite chord. It’s just C7 with the G moved up one fret. You can also play it like this.
It has a double dose of tension with the 7th note and the raised fifth. If I play it I can’t get on with my day until I play an F chord afterwards. That makes it a great chord to add to the end of a progression to propel you back to the home chord.
In a Progression
Here’s an 8 bar blues with the Caug7 at the end moving you back to the start of the progression.
Let me know your favourite chord (or chords) in the comments. Especially if there’s one you think I’ve overlooked. I enjoyed putting this post together and might well do a follow up in future.
I’m still enjoying She & Him Volume 3. Definitely their best so far. I did I Could’ve Been Your Girl when it came out. And since then I’ve had a few requests for Turn to White. The album’s ukulele track. Which I’m more than happy to do. Unlike that song she did with Prince which I’m not going to do no matter how many requests I get.
To play along with the record you’ll need to tune down a step to F# – B – Eb – G#. But if you can just play it exactly the same in standard tuning if you can’t be arsed retuning.
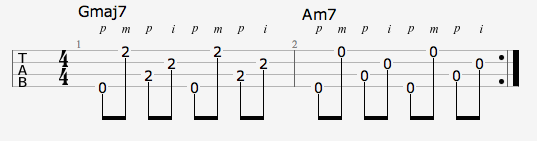
Picking
If you want to play it picking style use the thumb and two finger method. With the thumb covering the g- and C-strings. You can just use this pattern with all the chords in the song.
I’ve started accepting Bitcoin as payment for my ebooks. I made my first sale the other day and I’m excited to get into it. Right now the ebooks are 50% off when you buy with bitcoins. Partly because transaction fees are lower, partly because I’m interested in the possibilities and partly because I haven’t got an automated system for email delivery (but I spend all my time either asleep or on the internet so it shouldn’t be long. You can buy with Bitcoin here.
New Releases
– Leeds ukulele troubadour, Look Yonder’s self titled EP.
– Tony Penultimate (aka Peter Brooke Turner aka the tall one off of the UOGB) has a new album out this weekend Adventures in Gibberish. It’ll be available on CD Baby and The Ukes’ website. UPDATE: The release date has been pushed back a little to Wednesday 16th. I’m sure it’ll be worth the wait.
– Arhoolie’s reissue of Papa Lemon Nash.
I got a request from Justin saying that Alexandre Desplat’s music from the new Wes Anderson movie Grand Budapest Hotel would be perfect for ukeing. And he was absolutely right. As soon as I heard this tune I knew it would suit a campanella-style ukulele arrangement.
And it turned out to be even easier than I expected. Without even changing the key the whole first section of the verses mostly could be played on the open strings.
Trickiest Bit
As with most campanella arrangements the trickiest bit is memorising the string plucking order. If there’s a quicker way to learn it than playing through slowly over and over again I don’t know what it is.
Flicking the Bean
In the bridge section I’m trying to recreate the mandolin tremolo strumming. Tremolo strumming is a bit more tricky on the uke though. So I used a technique I refer to as “flicking the bean”.
It involves turning your strumming hand palm upwards and wiggling your middle fingers across the strings like this:
I regularly get people asking what I use in my playing and in putting together the site. To answer those I did a post back in 2010. Things have changed a bit since then (most notably it makes no mention of apps). So here’s what I’m using these days.
I’d be interested to know what you use: to record audio, make videos and, of course, what your favourite ukulele is. So do leave a comment.
Ukuleles
What size/make ukulele do you play?
This hasn’t changed much in the last four years. I play mostly tenors. With my favourites being the KoAloha Sceptre and Ohana TK-35G. I use those almost exclusively in videos. And I play the Ohana slightly more practicing even though it picked up a giant crack when I moved house.
Tabs:Guitar Pro 6. I’ve been using Guitar Pro 6 since I started the blog nearly seven years ago. I wrote a review of it here (tl;dr: I like it). Although this year it has at least got some worthy competition in the shape of Tabular.
Chords: I make the chord diagrams in Sibelius (I don’t recommend buying Sibelius though – I only bought it because I had to – but it does make attractive chord diagrams). Then I write up the chords in Pages.
Slow Downer: For slowing down songs to make them easier to tab. I use Capo (Capo 2 which I think isn’t available anymore). It does claim it can automatically generate chords and show you the notes being played. I’ve found those to be pretty much useless. But it does what I need it to do well.
Tuner:Cleartune (although I don’t have cause to use it often).
Tabs: I have all my tabs in PDFs on DropBox. Usually I just open them there. But if I want to do more with it or I’m going to be using it a lot then I import it from Dropbox into forScore.
Domains: UkuleleHunt.com is still on GoDaddy. Which I highly advise against you using. It’s a nightmare buying domains and they make it hard to do anything once you’ve bought them. These days I keep my sanity and buy new ones on Hover.
Site Design: The site and logo were designed by Ben Lew. Who is fantastic.
eBook Selling:eJunkie. Easy, cheap and I’ve never had a major problem with them in the six years I’ve been using them.
Misc.
Things that no one has asked about and don’t have an obvious effect on the site but without them the site would suck, be hacked or possibly not exist.
Online Storage:DropBox This is even more essential now. It used to be a pain keeping files in sync across computers. Now it’s impossible to keep them in sync across computers, phones, tablets, glasses, watches… without Dropbox. And it’s free (up to a point).
I know from experience that just having Amanda Palmer in the title is going to put off vast swathes of people who read the blog. But all the people who complain when I swear are amongst them so fuck ’em. But she did win many people over with her TED Talk and even more over with her response to the Faily Mail (you should never trust a paper that doesn’t know the difference between a ukulele and a balalaika). And I’ve had some requests for this one so here goes.
The song hasn’t been released yet so I’ve written up this live version.
Don’t be intimidated if you’re unfamiliar with the chord names. They’re all very easy to play. Most of the time she’s just switching between playing the A-string open and at the second fret.
Suggested Strumming
The strumming pattern is dead easy. It’s just down strums all the way through. Eight down strums for each chord for the most part. But 32 on the A7 (best to think of them in groups of 4).
The big challenge with the strum is keeping going. It’s pretty relentless and it’s a long song so it requires a bit of stamina.
Try varying the intensity of the strum in different parts of the song for extra emotional impact.


