If you don’t know that I wrote Ukulele for Dummies I obviously haven’t been doing enough shameless self-promotion. It did well enough that the Dummies folks wanted a follow up: Ukulele Exercises for Dummies. I’m highly allergic to the word “exercise” – I had to take half a dozen Benadryls just to write this intro – so I recommended they get Brett from Ukulele Tricks to write it.
I’ve been working with him on the book right from the start and he did a fantastic job with it. I’ve already learnt a ton from it and it’s inspired me to get more serious about practicing.
It’s out now in the UK, Canada and Australia and New Zealand. And you can pre-order it in the US.
You can read all about the book on Ukulele Tricks. And to give you an idea of what’s in the book Brett’s kindly agreed to share this post on fingerpicking exercises.
Those Benadryls are really kicking in now so I’ll let Brett take over from here.
Fingerpicking comes in many styles on the ukulele. You might use a repeating fingerpicking pattern to pick out the chord progression of a song as you sing the melody; this is what I like to call rhythmic fingerpicking. Or, you might pluck out the melody of a song on the ukulele without singing, sometimes known as fingerstyle or solo fingerpicking. Whether your fingerpicking for rhythm or melody, practicing arpeggios is a great way to improve your fingerpicking in either style.
In this lesson, I select ten different arpeggios exercises plus a song by the famous 19th century composer Dionisio Aguado (1784-1849) from my new book Ukulele Exercises For Dummies that you can use to increase your ease of movement, speed and accuracy as you fingerpick the ukulele.
How to Fingerpick the Ukulele
The following arpeggio exercises are designed to work out each finger in your picking hand: thumb (represented by a p), index finger (represented by an i), middle finger (represented by an m) and ring finger (represented by an a). The letters p-i-m-a represent the Spanish word for each finger, which originates from early Spanish guitar pieces.
Most of the time, I like to assign my thumb to pluck the g-string and C-string of the ukulele (top two strings), index finger to the E-string and middle finger to the A-string (bottom string). However, sometimes it works best to assign each finger to a string. This means, the thumb plucks the g-string (top string), the index finger the C-string, the middle finger the E-string and the ring finger the A-string (bottom string).
When plucking the strings of the ukulele, for the most balanced sound, aim to pluck the string with the part of your finger where the flesh of your finger meets the fingernail. If you pluck more with the nail, you get a brighter more lively tone, and if you pluck more with the flesh of your fingers, you get a softer, warmer tone.
If you’ve never fingerpicked the ukulele before, it can be a bit awkward at first. Be patient with yourself and avoid the impulse to smash your ukulele up against a brick wall because your fingers need time to build up some strength and independence from one another. Each of the following arpeggio exercises makes use of different fingers to help you do exactly this!
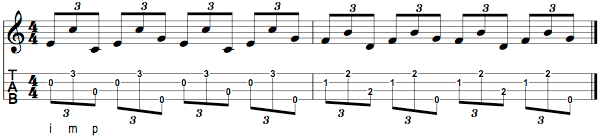
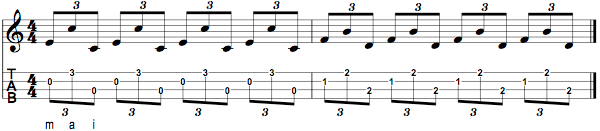
‘P i m’ arpeggio exercises
To play an arpeggio, pluck individual notes of a chord in a repeating pattern with your picking hand. After plucking each note, allow it to ring out as long as possible until plucking the string again.
These first few arpeggios use your thumb, index and middle fingers in varying orders. Each arpeggio is played in groups of three notes, so play these patterns in an eighth note triplet rhythm counting: 1 – trip – let, 2 – trip – let, etc.
UPDATE: A few people have had trouble seeing these images. If that’s you, here’s a zip file with all the exercises.
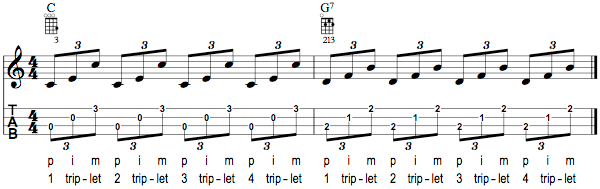
The next two exercises alternate your thumb between plucking the top two strings.
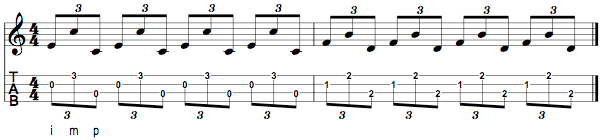
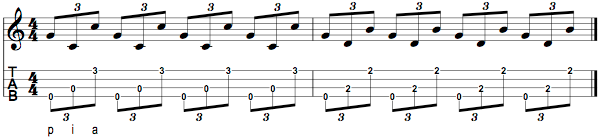
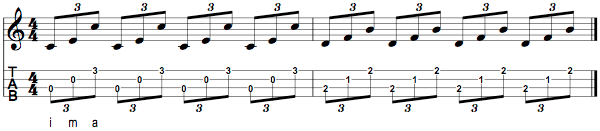
‘P i m a’ arpeggio exercises
Now add in the use of your ring finger (represented by an a). These exercises are a bit more difficult because the ring finger isn’t known to be the strongest finger in your hand. Use these exercises to build up strength and to free up movement in your ring finger.
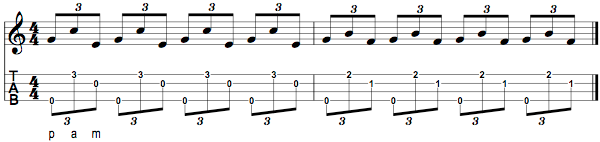
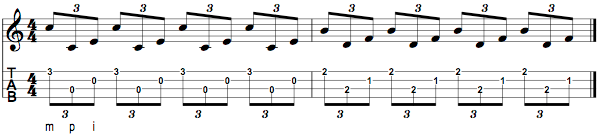
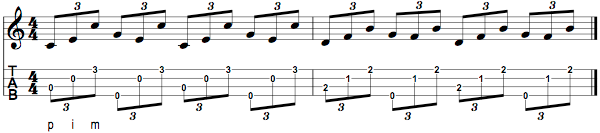
The last three exercises eliminate the use of your thumb and focus on working out your index, middle and ring fingers.
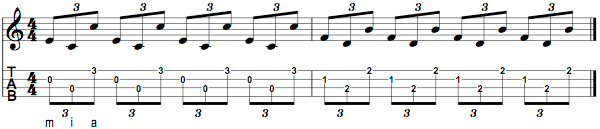
Practice tip: In these exercises, you switch between just a C and G7 chord. For more practice, write out your own chord progressions and practice these arpeggios while switching between other different chords.
Dionisio Aguado’s “25 Pieces Pour Guitare, no. 17”
The cool thing about arpeggios is that they are used quite often in classical and Spanish guitar pieces to play beautiful and intricate-sounding fingerpicking pieces. When these pieces are arranged for ukulele, they are really fun to play and sound quite impressive.
Aguado’s 25 Pieces Pour Guitare, no. 17 is played solely on the bottom three strings of the ukulele. Use either a constant p-i-m or i-m-a arpeggio to play the piece. Try your hand at playing this piece!
Aguado’s 25 Pieces Pour Guitare (Tab and Sheet Music)
Aguado’s 25 Pieces Pour Guitare (MP3)
To take it to the next level, compose your own intricate fingerpicking piece by coming up with your own chord progressions and using an arpeggio to play the chords. You might even experiment with using moveable chord shapes across the ukulele fretboard to get more interesting tones out of what would be really common chords.
Brett McQueen is the founder of Ukulele Tricks and author of Ukulele Exercises For Dummies, a brand new ukulele practice book with hundreds of fun exercises, drills and practice tunes in a wide-range of styles. Now available on Amazon.com here.


i kinda like the fingepicking beter, because I’m still have trouble with struming, still working on it . never give up